Best Exercise after Rotator Cuff Repair
Natural history of rotator cuff tears:
Though some partial-thickness and some small full-thickness tears of the rotator cuff may heal spontaneously without surgical intervention, the natural history of rotator cuff injury appears to indicate that most small tears will enlarge if not surgically repaired. Timely repair is also important as with time torn cuff retracts and degenerates. Its protein content gets replaced by fat (fatty atrophy) and repair in fatty cuff may not give satisfactory results.
Commonly asked questions:
When can I drive a car?
Post repair you can drive a car when you get adequate range of motion of your shoulder. Your reflexes should be quick enough to react in the event of an emergency. This usually takes 8 weeks or more depending on the tear severity and repair strength.
When can I return to my work?
You can return to desk job work at 4-6 weeks. Those in more manual work should be guided by the ability of the patient to perform the functional activities of their job. Field work requires 3 months or more to get back to work.
How long should I wear brace?
An abduction pillow and brace are advised for first 6 weeks after surgery.
How long do I require to exercises?
Passive exercises for 6-8 weeks, active ROM exercises till 3 to 4 months, strengthening exercises till 6 to 9 months.
Care After Surgery
- Use of an ice pack is helpful in reducing pain and swelling for 10–14 days after surgery. Do it 5-6 times a day and after exercises.
- Immobilization: keep the shoulder immobilized for 6 weeks in a slightly abducted position. It minimizes tension and maximizes vascularization of the repair. You should come out of the immobilizer for supervised passive motion exercises in phase I of the rehabilitation, approximately week 1–6 postoperatively, and active assisted range of motion when commencing to phase II, usually week 6 postoperatively.
- As with any surgery, you should expect some degree of pain. Painkillers will be prescribed and it is advised that you take them regularly so that you can perform your exercises and you are able to use the arm.
- Don’t take shower until removal of stitches (2 weeks after surgery). Keep the wounds dry until they are healed. You should cover the shoulder with plastic bag while bathing.
- Don’t push or lift weight for first 3 months.
- You should sleep with shoulder brace on. You can use a pillow to support the arm as shown in the pictures below.
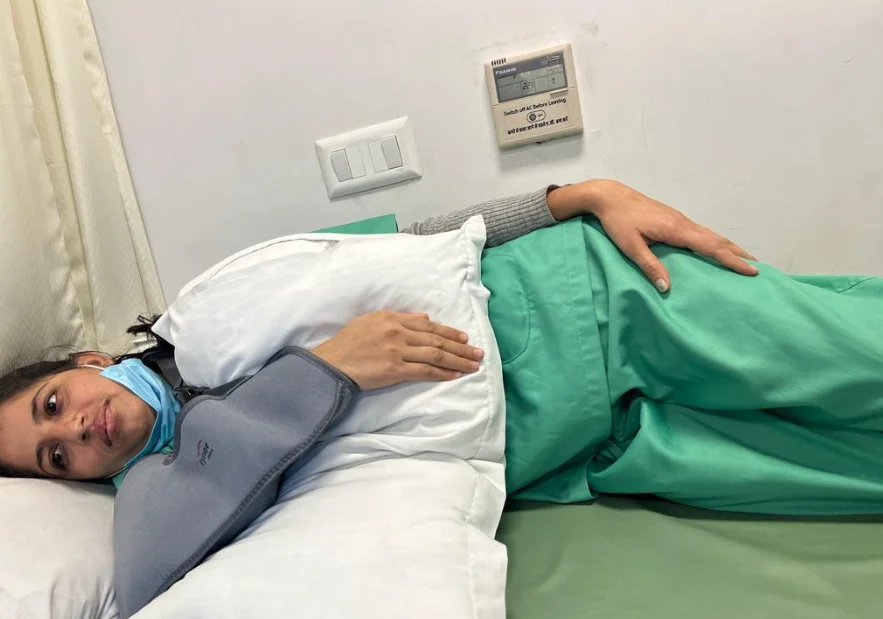
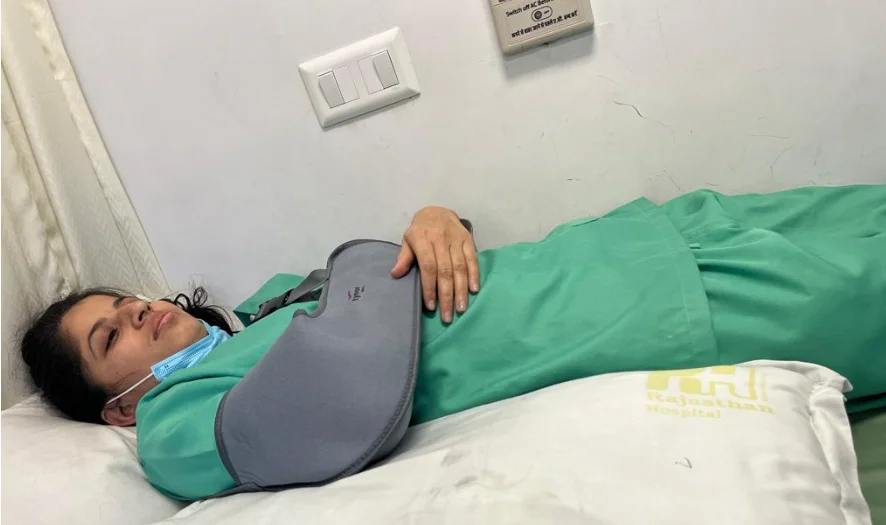
- Use brace while sleeping also.
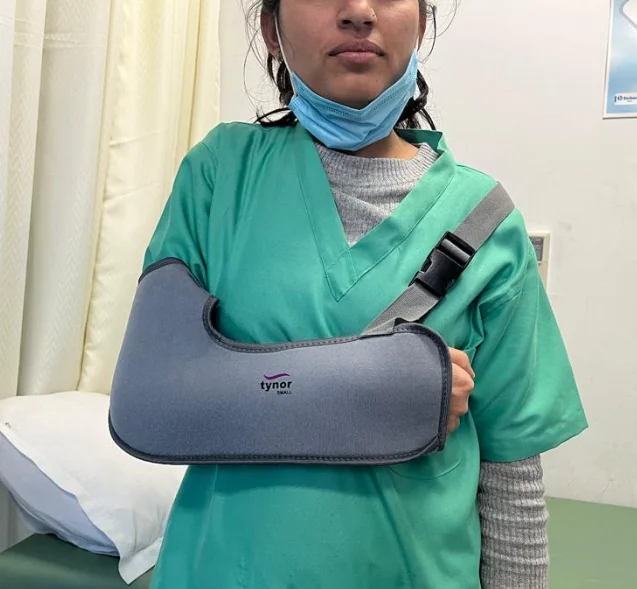
- Correct position of brace/sling: your wrist and elbow should be well supported. Your shoulder should not feel stress/ stretch. Strap of brace should come around opposite shoulder and not around neck.
- In case of dressing soakage/stain, excessive pain inform @ 9664429206
Remember:
Tendon takes 3 months to get attached to the bone. Sharpey fibers which hold the tendon and bone together did not appear in any considerable number until 12 weeks suggesting that excessive tension on the repair be avoided for 12 weeks post-surgery. So don’t overstretch, or lift heavy weight/push using operated limb in first 3 months post surgery.
Rehabilitation Program after Arthroscopic Rotator Cuff Repair
Phase 1: you should do gentle passive exercises so that a balance can be maintained between the promotion of tendon healing and preventing the development of postoperative adhesions.
0-2 weeks: Do all exercises morning and evening with 10 repetitions at a time.
- Finger exercises: open and close fingers as shown in the picture below. You can do it with elbow bent or straight.
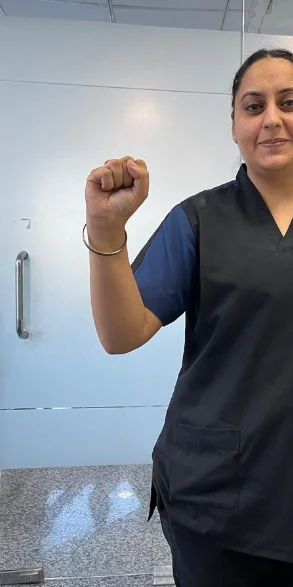
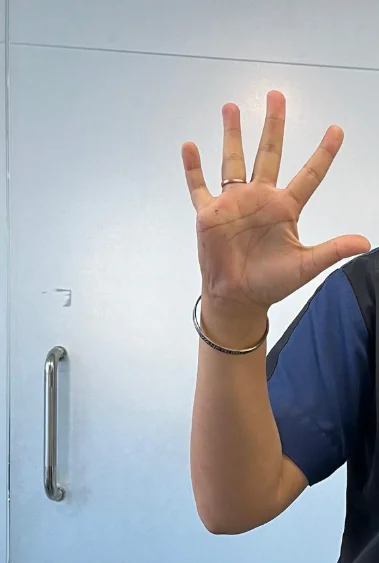
- Elbow exercises: bend and straighten the elbow by moving the hand slowly up towards shoulder and then return to starting position.
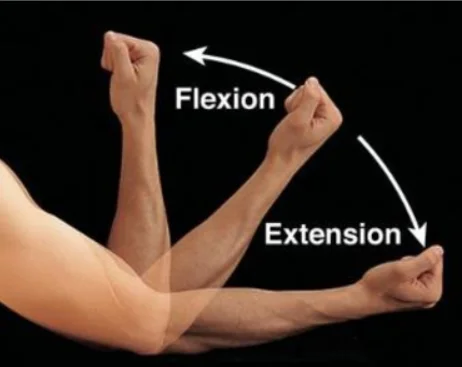
2 to 4 weeks: continue elbow and finger exercises and start these exercises:
Passive external rotation: The patient lies supine and relaxes. Arm is kept by the side of the body with the elbow bent at 90 degree and fingers facing upwards. The patient should relax and should not contract any muscles while the therapist or family member pull the forearm so your arm rotates out away from your body up to 30 degrees, and then pull it back to starting position.
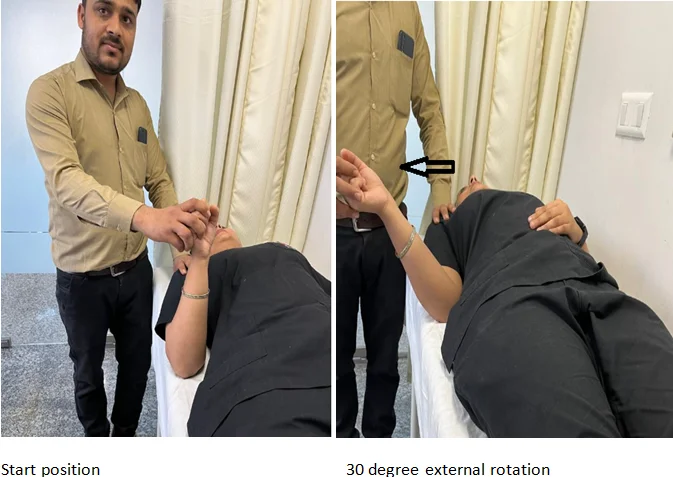
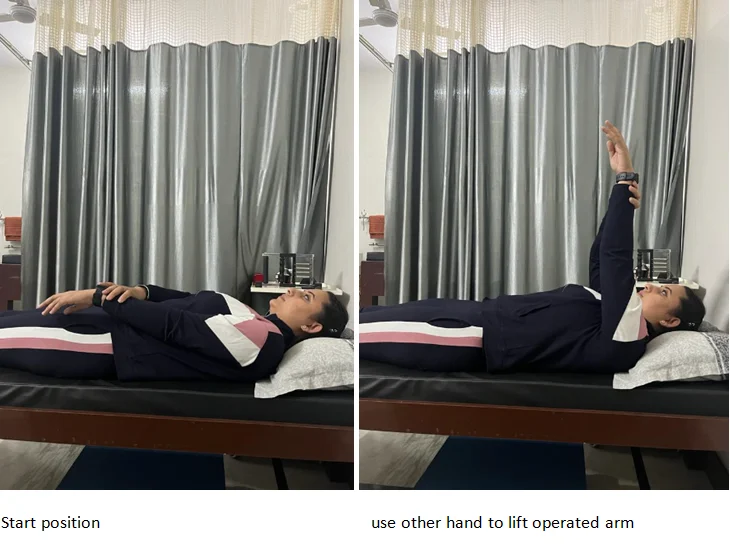
Shoulder passive elevation– lay down onto your back. Use your healthy hand to hold the wrist joint and elevate the operated arm through pain free range. Any therapist or family member can also do it for you. Stop wherever you feel stretch. Gradually increase the range up to 90 degree.
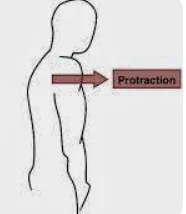
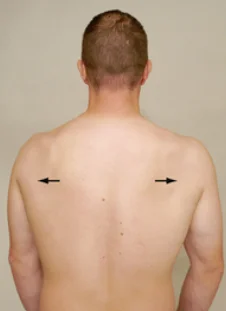
Scapular protraction: this is forward movement of your shoulder. Move the both shoulders together forwards and then hold for one second and bring them back to neutral position. Do it 10 times and repeat it morning and evening.
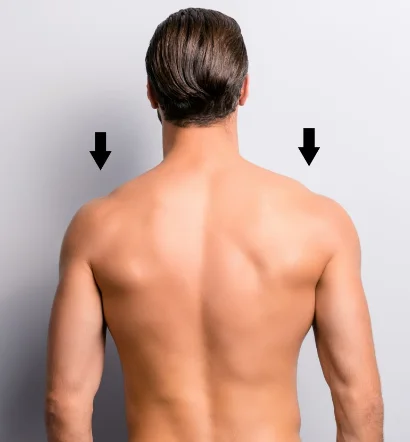
Shoulder depression: Drop your both shoulders together down, hold for one second and then move them up to neutral position. Do it 10 times and repeat it morning and evening.
4 to 8 weeks:
Continue above mentioned exercises. Now increase forward elevation beyond 90 degree and external rotation beyond 30 degree.
Start passive abduction and internal rotation and passive pendulum exercises at 6 weeks
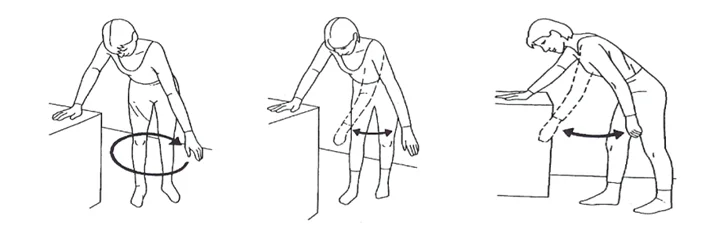
Passive pendulum exercises: Bend forward at the waist, using a table for support. Rock your body in a circular motion to move your arm clockwise 10 times (minimum). The initiation of arm movement in this exercise is to be created by the body performing rocking or swaying motions, allowing the effected shoulder to hang and move passively. The key component of this description is passive.
Similarly sway your body and let gravity gently sway your arm side to side and forward and back.
DON’T MOVE YOUR ARM ACTIVELY.
Passive abduction: Lie down, with your operated arm by your side. Now therapist or family member support your operated arm and lift it out to the side until you feel gentle stretch. It is important you keep your arm completely relaxed and don’t actively move the shoulder.
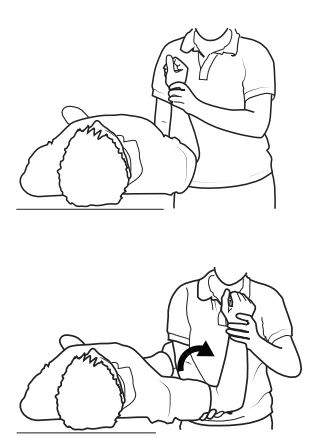
- continue exercises to get full passive range of motion by 8 weeks post-surgery.
- Abduction brace/sling. Pillow may be removed at week six post-op.
8 to 12 Weeks weeks:
Start active assisted motion at 8 weeks
Supine active assisted forward elevation: Using a stick or cane, the normal arm will move the affected arm over the head. Then take it back to starting position. Repeat it 10 times, morning and evening.
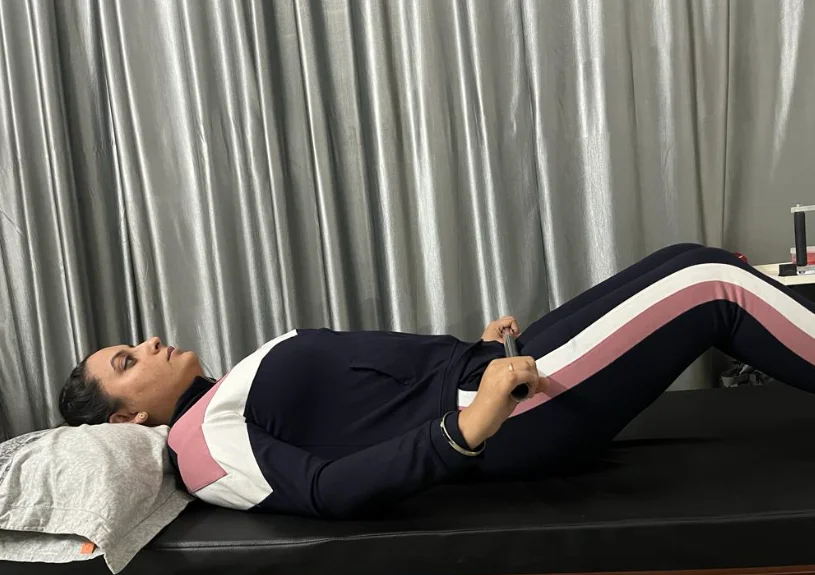
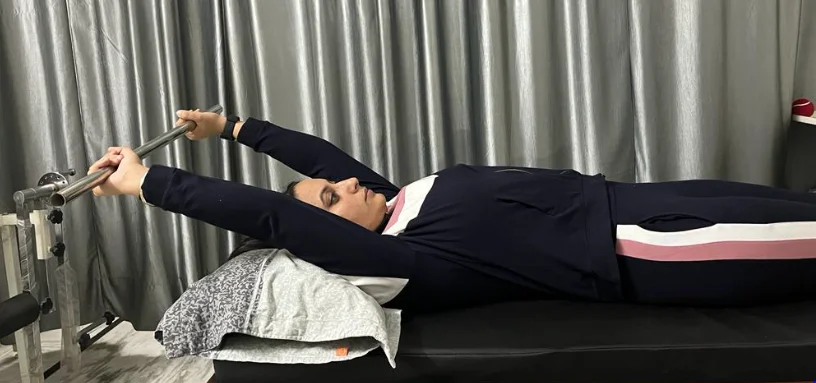
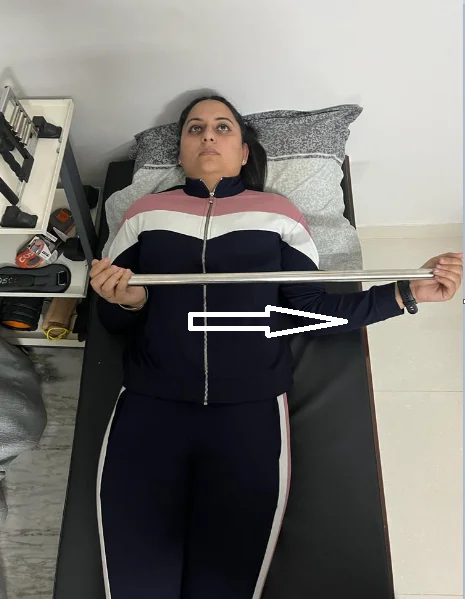
Supine active assisted external rotation: Lying on your back, keep your arms by your side. Now hold a cane between your hands and push the operated hand away from your body until you feel gentle stretch in your shoulder, as shown in the picture. Gradually increase the range. Do it morning and evening with 10 repetitions every time.
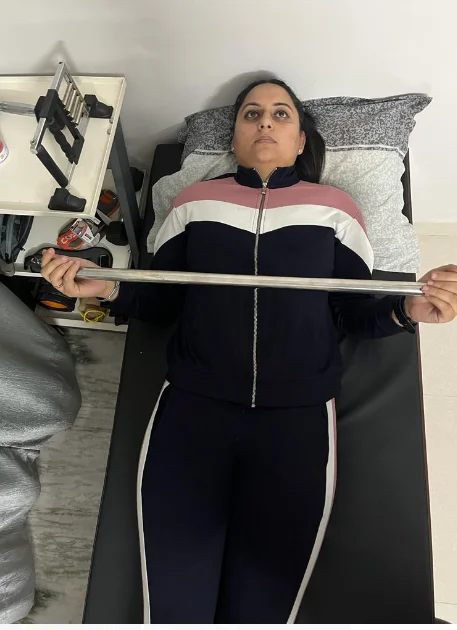
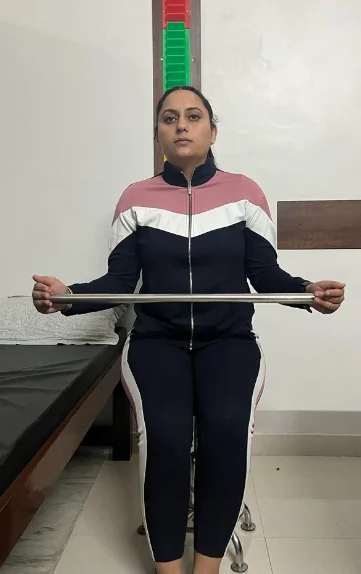
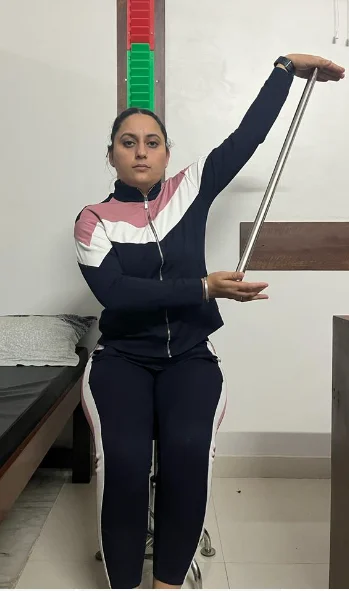
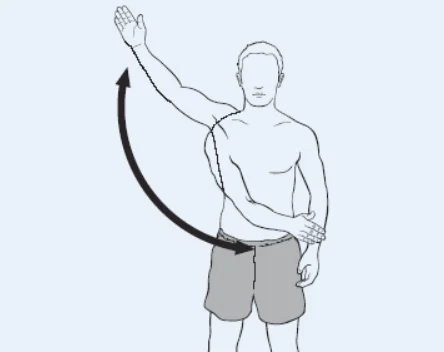
Active assisted abduction: You can do it in standing or supine position. Do not shrug your shoulder or tilt your body while doing his exercise. Using a stick to assist (as shown), raise your operated arm out to side with elbow straight and palm facing upwards. Slowly increase the elevation of your arms as the day’s progress, using pain as your guide. Repeat 10-20 times.
13 to 16 weeks : Start active motions at this time.
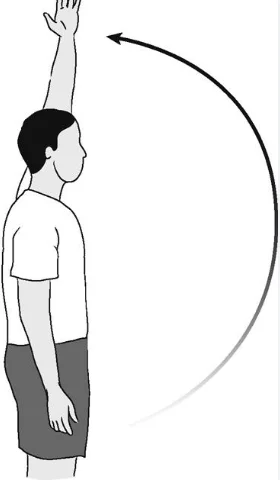
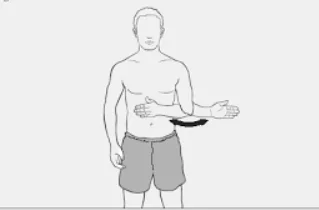
While continuing to work on active assisted range of motion, the patient now begins active range of motion in forward elevation, external rotation and abduction.
Forward elevation:
Abduction:
External and internal rotation:
Once you get full active ROM of shoulder start sleeper stretch, crossover arm stretch and proprioception exercises:
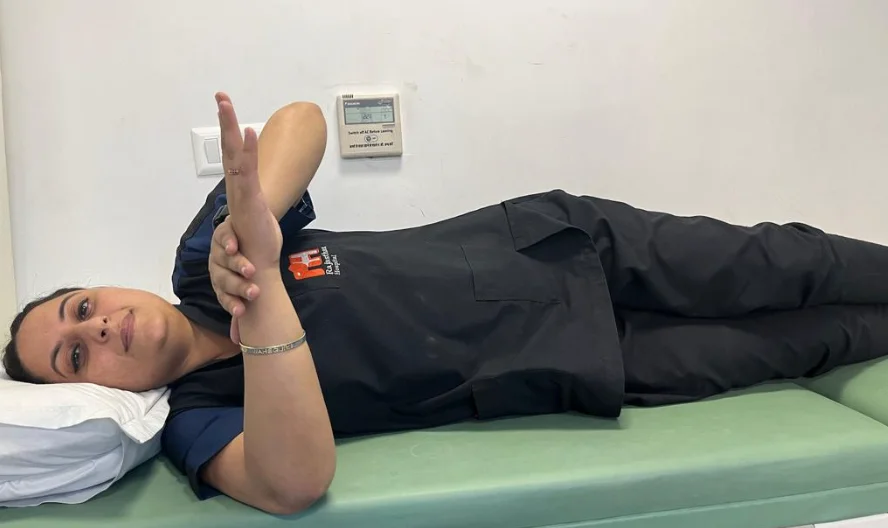
Sleeper stretch: – the 90/90/90 stretch, Lie on the involved side with your arm positioned away from your body, ideally at a 90⁰ angle from your body. Bend your elbow so your forearm and upper arm are at a 90⁰ angle. Use other hand to GENTLY push your affected arm toward the surface you are lying on. Hold it for 20 seconds then relax. Repeat it for 10 times.
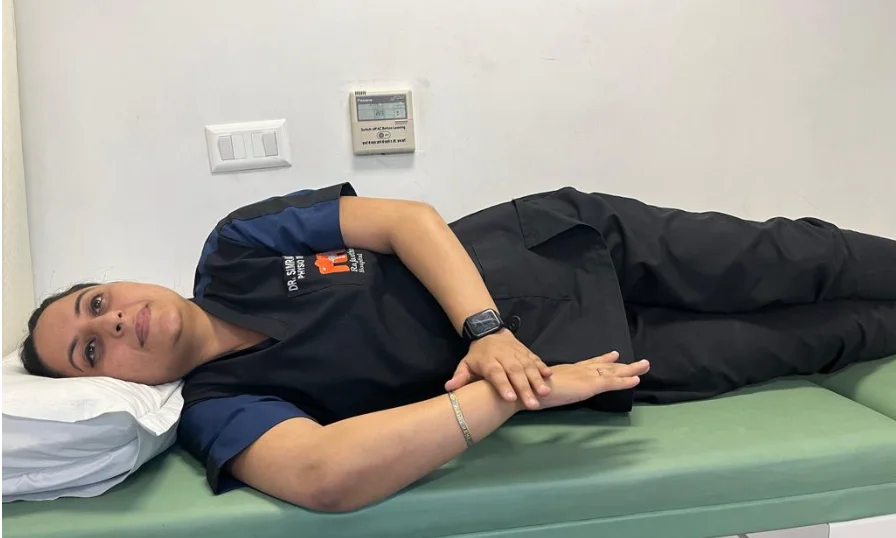
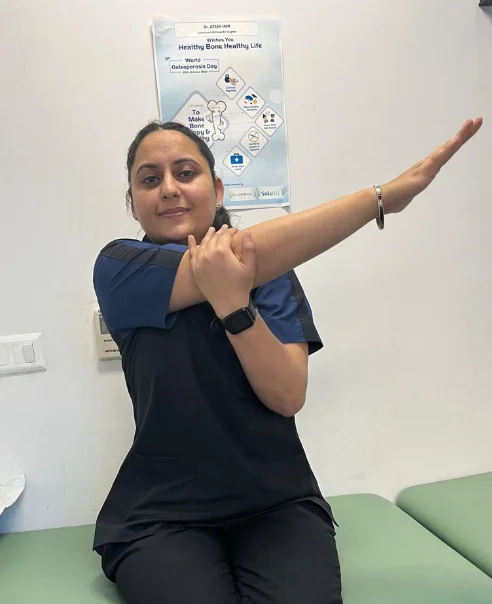
Crossover arm stretch: pull the operated arm across your chest as far as possible, holding at your upper arm. Hold the stretch for 30 seconds and then relax for 30 seconds. Do 10 repetitions.
Proprioception exercises:
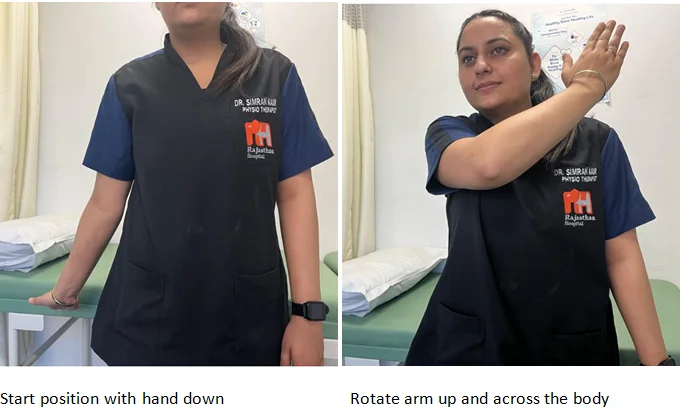
Pattern 1 P Exercise: Stand with your arm down at your side with thumb pointed down. Bring your arm and hand upward and across your body with your thumb pointed upward and your hand slightly above your head as shown in the picture. Then return to starting position. Do 10 repetitions.
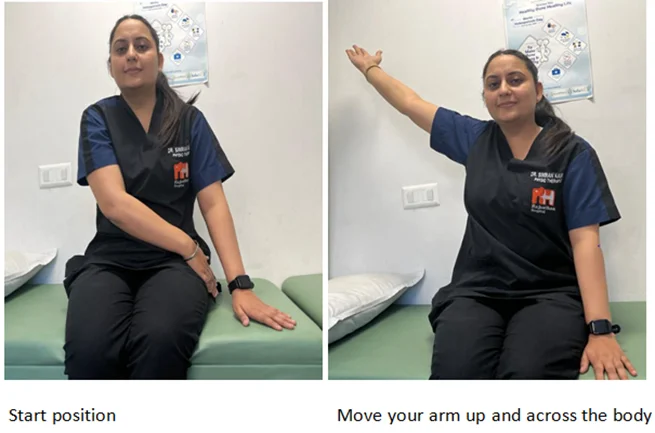
Pattern 2P Exercise:
Stand with your hand internally rotated as shown in the picture below and then move it up across the body diagonally. Finish with your hand above your head and out to the side. Do 10 repetitions.
Isometric exercises: from 14 to 18 weeks
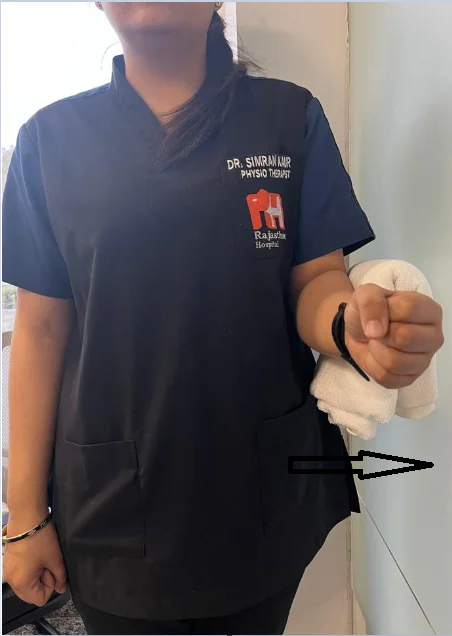
Isometric Push and pull exercises: without moving the shoulder you push a pillow against the wall with fist. Hold for 15 seconds, and then relax for 15 seconds. Do 10 repetitions. Same exercise is repeated but this time you push the pillow against wall with your elbow.
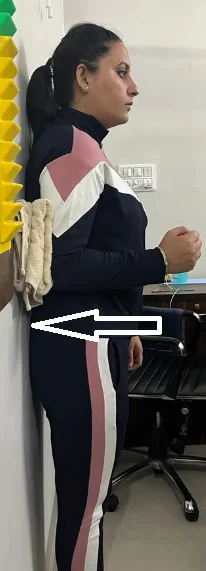
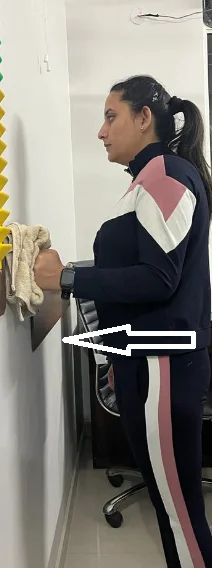
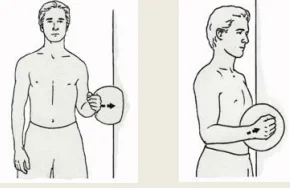
Isometric external and internal rotations: With a pillow against a wall, and the arm tucked close to the body, you push the pillow with the back of the hand for external rotation and with the palm of the hand for internal rotation. Hold for 15 seconds, and then relax for 15 seconds. Do 10 repetitions.
16 weeks onwards: Resisted exercises:
Theraband exercises:
Rowing exercises: use your muscles around shoulder blades and pull your shoulder blades back and down. At the same time as shown in the picture, perform a rowing motion keeping your elbows close to your body. Return to the start position (elbow straight). Do 10 repetitions.
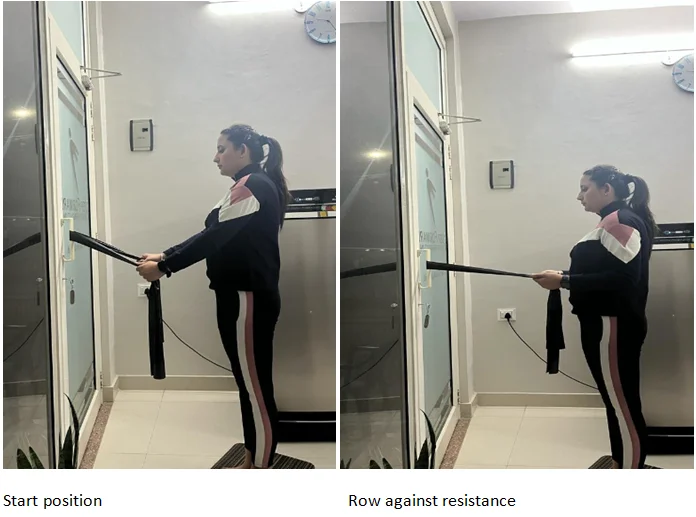
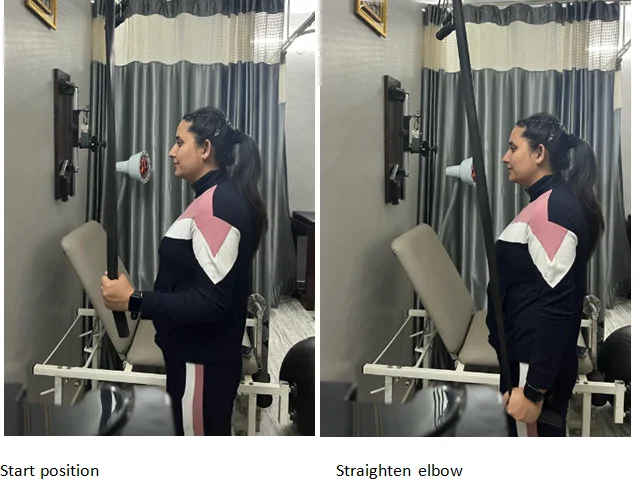
Triceps exercises: straighten your arm as shown in the picture below against resistance, Do 10 repetitions.
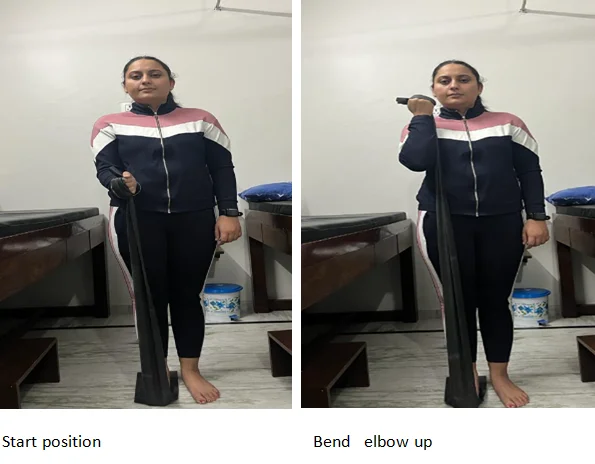
Elbow flexion exercises: hold theraband by looping around it your feet. Then pull it against resistance by flexing the elbow. Do 10 repetitions.
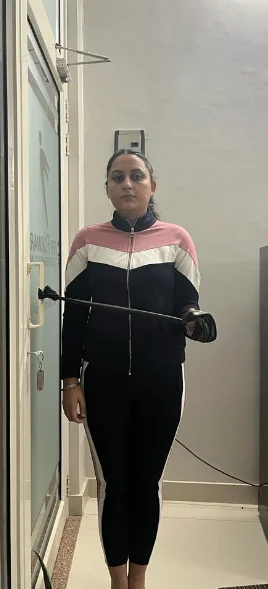
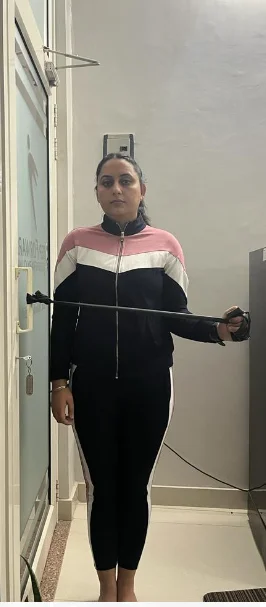
Resisted internal rotation: Make a 3 feet long theraband loop around a doorknob and internally rotate the arm against resistance as shown in the picture by moving the hand towards the body. Keep the elbow tucked by the side of the body. Do 10 repetitions.
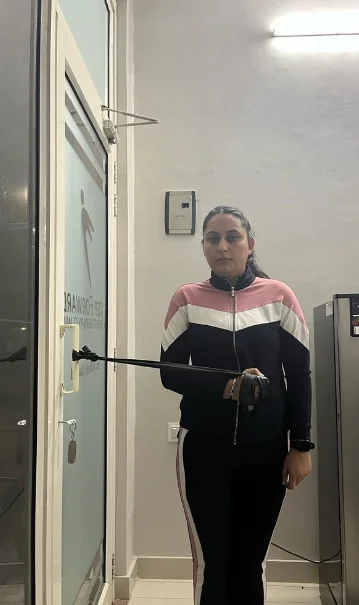
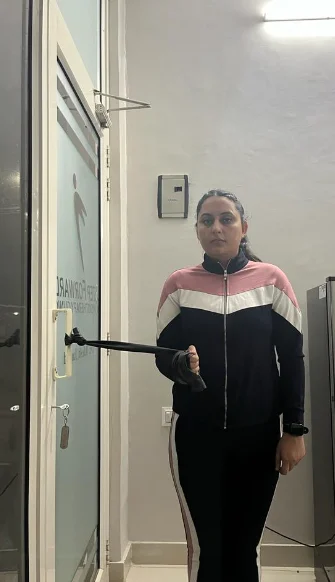
Resisted external rotations: Do same as above but this time move the hand away from your body. Do 10 repetitions.
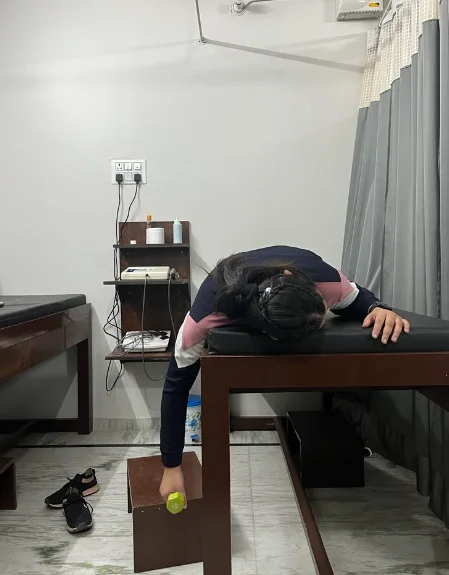
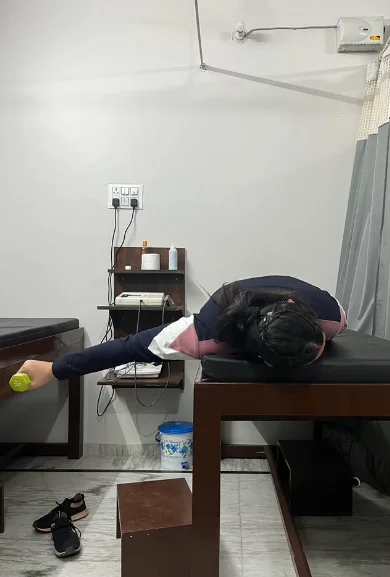
Bent over horizontal abduction: Lay down on your stomach with arm hanging at the edge. Hold 1 kg weight and slowly raise it upto the shoulder level. Slowly lower it back to starting position. Do 10 repetitions.
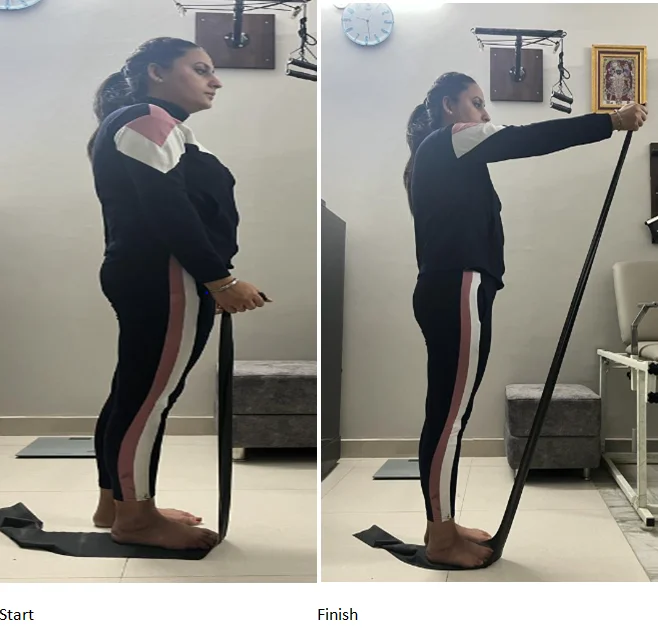
Forward flexion: Have the theraband secured around your foot. Start at waist height and raise your arm against the resistance of the band. Raise your arm as far as is comfortable plus a bit more, hold for several seconds, then slowly lower.
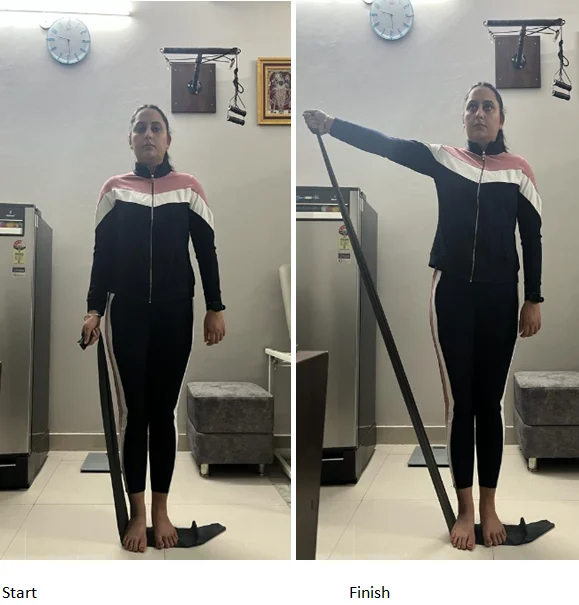
Abduction: Again, the theraband is secured at foot level. Raise your arm straight out to the side against the resistance of the band. Raise your arm as far as is comfortable plus a bit more, hold for several seconds, then slowly lower it down.
ABOUT THE AUTHOR
TESTIMONIAL

मेरा दाए पैर में चोट लगने के कारण टेढ़ा हो गया था जिसकी वजह से मुझे चलने में भी परेशानी हो रही थी. डॉ जितेश ने ऑपरेशन कर के इसे सीधा किया. में बिलकुल ठीक हूँ .

मेरी बेटी के घुटने में इन्फेक्शन होने के कारण वो दर्द की वजह से सो भी नहीं पाती थी. डॉ जितेश ने ऑपरेशन कर के इसे ठीक किया. बहुत धन्यवाद।

I remember that Dr. Jain came out from his clinic to see my mother because my mother was not able walk a single step. He did total knee replacement on both side and now my mother is walking without aid.
OPENING HOURS
| Monday – Friday | 17:00 – 20:00 |
| Sunday | OFF |

